The Intricacies of Retreating in Marvel SNAP
Wisdom as Old as Time
If you’ve spent any time on the Marvel Snap Discord or Subreddit looking for tips to get better and climb the ladder, I can almost guarantee that you’ve seen the advice “Get better at snapping/retreating”. While it is true that this becomes the key to climbing after a certain rank, often there isn’t much more detail provided about exactly what that means. Maybe you ask for more details and they’ll throw you a bone by offering that you should “snap when you’re winning, retreat when you’re losing” - but that isn’t much more helpful than the first piece of “get good”.
In this post I want to look at some intricacies of Retreating which I feel are often not verbalized.
An Example Board State
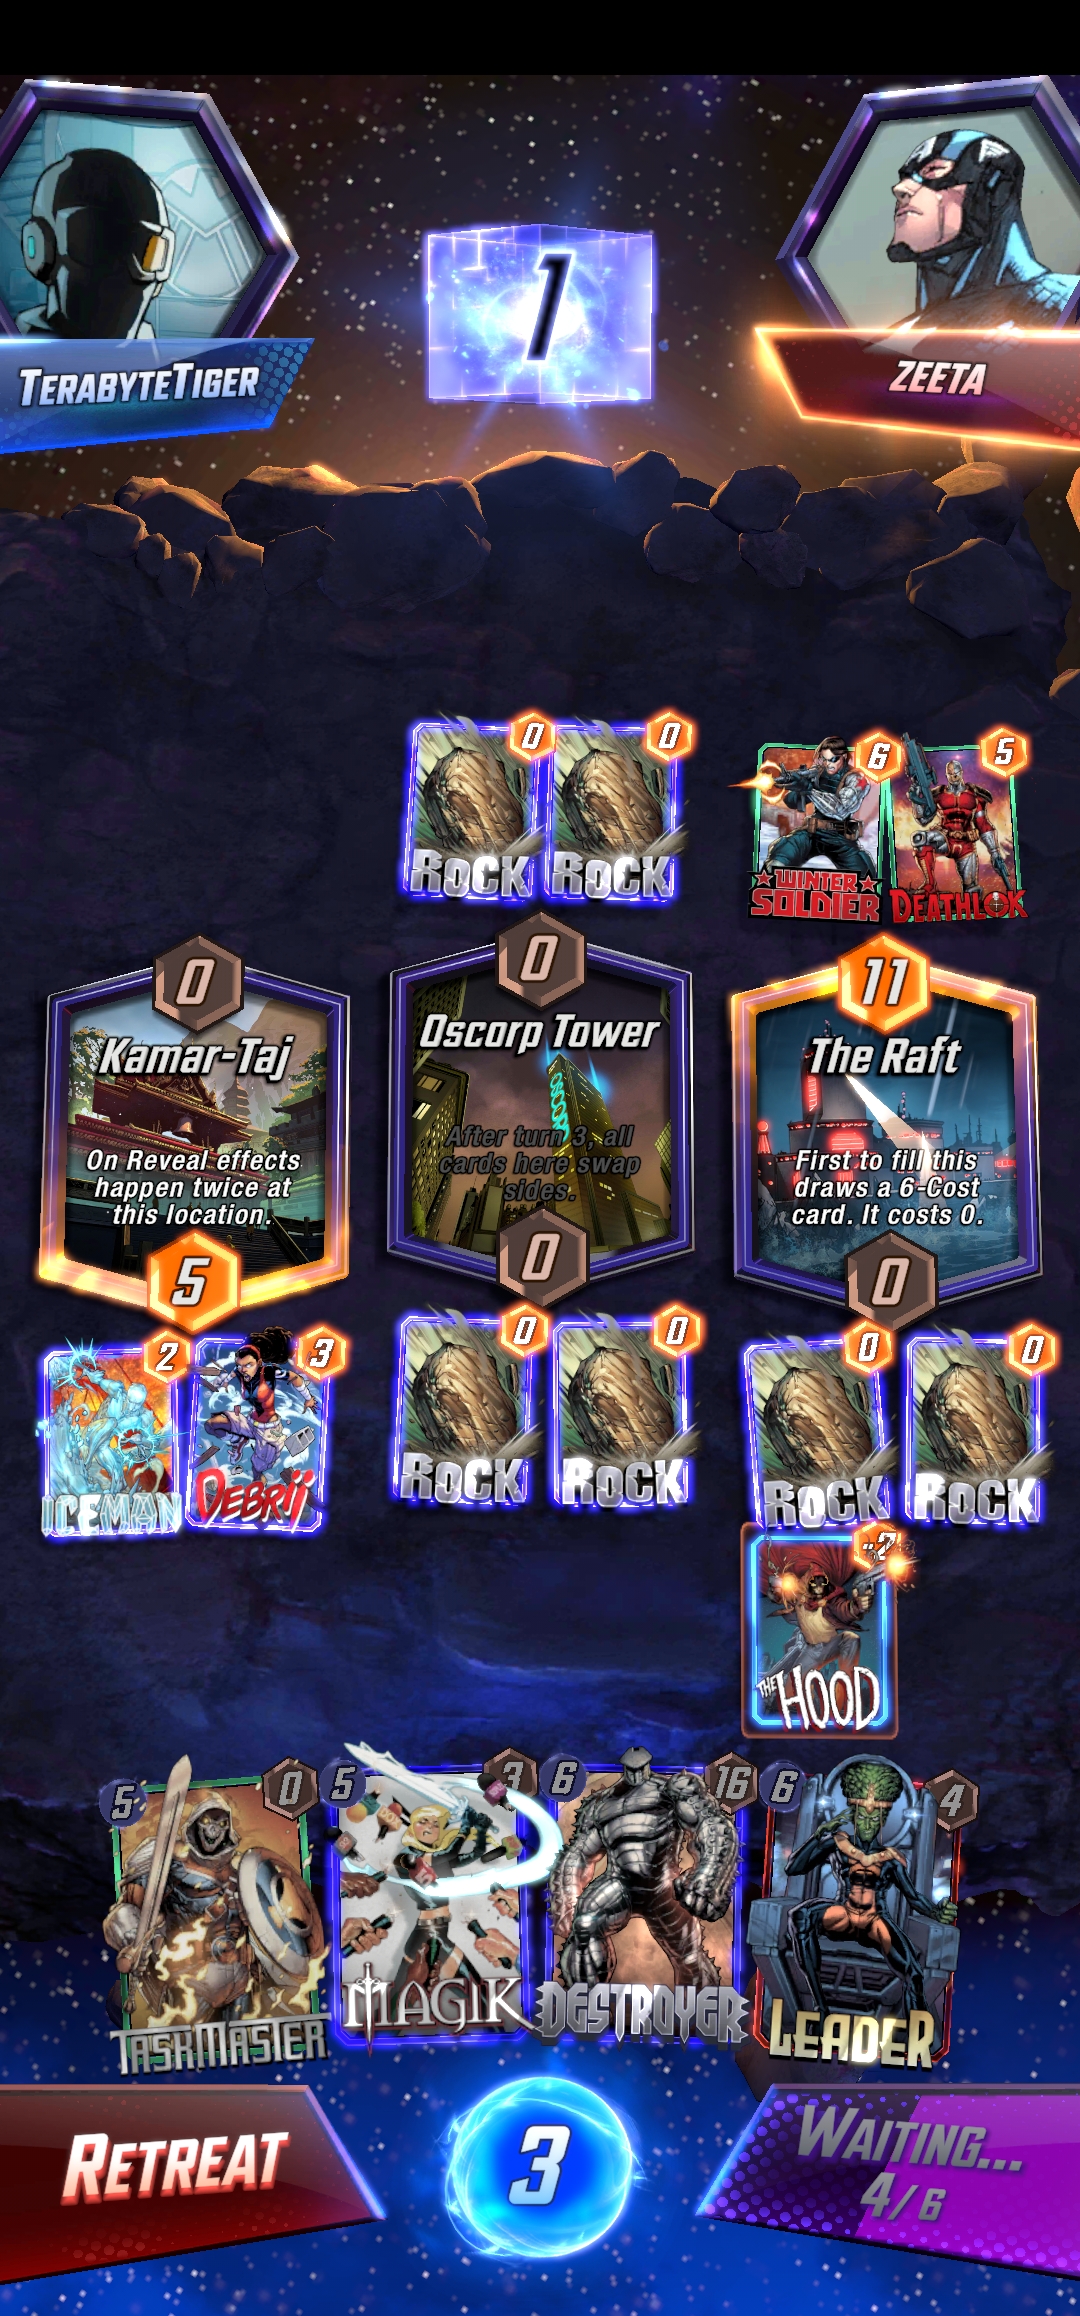
Consider this board state - It is turn 4, my only play this turn is The Hood onto Raft, and neither player snaps. Last turn, I played Debrii with priority on Kamar-Taj and my opponent played Deathlok, so they have the 6-drop from The Raft.
I would encourage you to take a moment and evaluate this position before continuing:
- Who’s more likely to win this game? (for deck context, see the spoiler lower on the page)
- Should they snap? If so, which turn do you think they should snap?
Deck Context
My deck is from the Snap discord which I've taken to calling “Definitely not Destroyer” (Thanks clumsykyo for sharing), which plays as a Destroyer combo deck where you play disruption turns 1-4 instead of playing the normal Professor X/Armor package, then ideally turn 5 Magik, turn 6 Destroyer, turn 7 Taskmaster + 1 drop (preferably a 1/6 Demon from The Hood).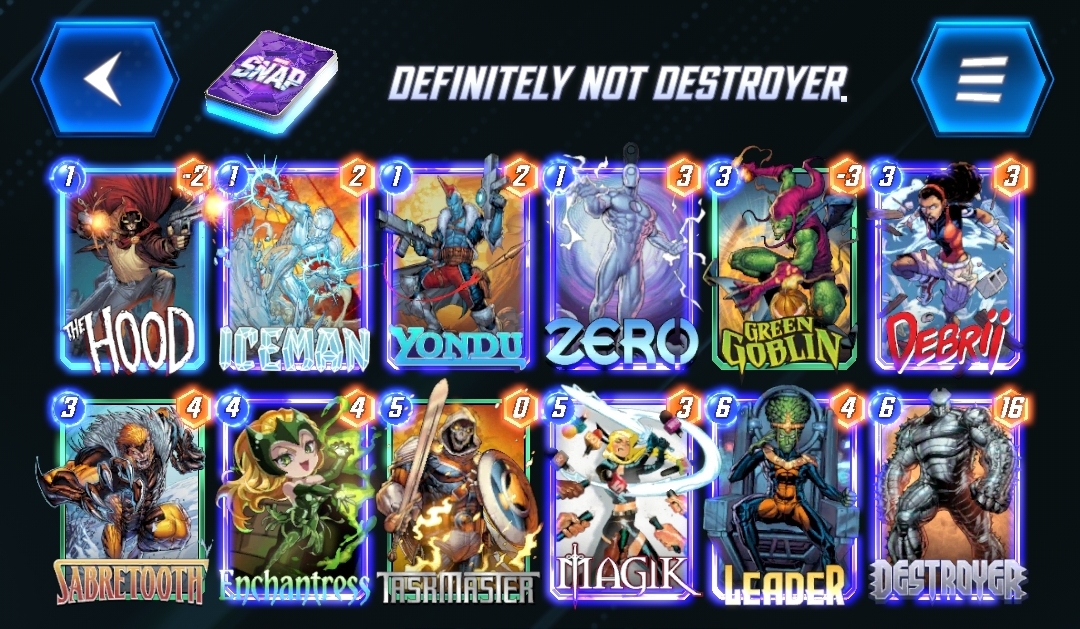
My Evaluation
My high-level evaluation is that my opponent is winning with significant chances, and they should Snap here, and subsequently I should retreat (note that I don’t retreat unless they snap though). If not right now, they definitely should after I spend turn 4 to play a single 1 drop.Now let’s break down why I would give this evaluation.
Evaluation Breakdown
Turn 3
The first reason I think my opponent should be instant-snapping here is because we’re coming off a failed play from my side. After my opponent played Bucky on turn 2 and The Raft revealed on turn 3, I was trying to catch them being greedy by using Debrii and Kamar-Taj to lock down The Raft. Because of the nature of The Raft, this is maybe slightly less good than locking down my opponent’s side of the board for most other locations, but I was willing to make this play with the understanding that I was giving my opponent compensation for having a locked location.
Compensation
Diving into a bit of a tangent on compensation - there’s more to this than just “You receive a random 6 drop, I win this location”. For starters, there’s a chance they have access to Killmonger to free up the location again for turn 5. But even outside of the specifics of my opponent’s deck, locking down the location isn’t enough on its own to win a location. I still need to spend cards and energy on the next few turns to ensure I win that location, which will siphon from the points I could put into other locations. Knowing exactly how many points my opponent has on that location I can minimize how many points I spend contesting, but still need to consider potential buffs to that lane from other cards.
Within the context of this specific game/deck, though, there’s another huge benefit to my opponent having a locked down location - Safe Magik. Going into turn 5 against my opponent, it was still unclear if they were playing Venom Zola, Death Wave, or a classic Destroyer deck. Since I didn’t know, there’s always a chance that turn 5 would go
If my opponent doesn’t spend turn 4 playing Killmonger in order to clear out space in The Raft, that would allow me to guarantee that my Magik sticks and I get turn 7 to combo off - something I considered worthwhile in combination with knowing I’d win the right lane if my Debrii lockdown worked even with my opponent’s access to a free 6-drop.
Retreat if and only if it’s the turn that a Snap happens
Note: For this segment, consider turn 6’s natural cube doubling as a Snap.
I don’t retreat unless they snap though.
So why do I think that my opponent should have snapped specifically on turn 4?
It’s all about information.
If neither player snaps during a game, turns 1-5 are all worth 1 cube regardless of when you would retreat, so in almost every situation until there’s a snap, there’s no reason to retreat before turn 6.
Building on this, the only turns to consider retreating are turns when there is a snap.
If your opponent snaps on turn 2 and you decide to stay, turns 3-5 will all be worth 2 cubes, so until the snap on turn 6 there’s no reason to leave. The risk is the same once you decide to stick around, so there’s no downside to playing it out more, even if on turn 4 you realize you need an exact sequence of draws for the rest of the game and your opponent needs to play Magik for you.
When there’s no added risk, you may as well find out more about your opponent’s deck, hand, and game plan. Even when you are fairly confident you’ll lose the turn after the snap happened, the worst case is you re-queue into them immediately after this game and you can quickly identify if they’re playing the same deck, and if so, you know some contents of the deck.
I think a lot of players perceive the snapping player has the power because they believe they are winning, but in reality, it’s the non-snapping player that has the power. They get to decide if they want to gamble the extra cube for additional information, or if they want to back out from what they’ve already seen happening in the game.
Why Not?
So now that we’ve looked at why I believe my opponent should have snapped, consider why they may not have. There are 2 (similar) reasons I would consider that my opponent didn’t snap:
- Iceman
- A “Do Nothing” hand
Because of the double Iceman freeze from Kamar-Taj, there’s a chance my opponent’s hand is looking a bit rough. Especially if they were trying to play a Wong Combo style deck, there would be a fair enough chance that Iceman disrupted their combo. However, I would say it’s pretty clear at this point that my opponent isn’t playing a deck that wants to hard-combo and can’t win without their combo hitting the board on exact turns.
The other option is they’re looking at a hand that just doesn’t have much more power to put on board - either from the Iceman freezes, or just a bunch of cheap units and no destroy effects. I think this would be a valid reason to hold off on snapping for another turn or 2 to see the draws, but isn't something confirmable. My opponent would need to heavily indicate that they have absolutely nothing going on in order for me to stay through any snap from this point though.
Summary
Hopefully this helped bring into focus some of the wider concepts around retreating and how Snapping creates a decision point in the game for the non-snapping player to either retreat or say “I want some more information first”.